Showing posts with label DIY. Show all posts

Tuesday, August 28, 2012

Crayon Wreath

Yesterday, I posted about the first day of school and showed a preview of a wreath I made for my classroom. For the base of the wreath, I used a craft ring like this. (I bought mine at Michael's, but this one is comparatively priced on Amazon.) I used the remaining crayons from my melting art project.

I started by laying the crayons on the base in a circle. I was having trouble keeping them even, and forming a perfect circle in the middle. After trying several household objects to fit in the center, one of my pots acted as a perfect base to work around.

After I had the crayons laid out in position, I put a strip of hot glue on the back of each crayon.

You'll notice I don't have ribbon to hang the wreath. I would suggest gluing some ribbon around the base right away so that you can hang it later. Then you can glue crayons over it an not even notice it underneath. I didn't do this until I was done, and unfortunately don't have a picture of mine with the ribbon. I meant to take a picture today of it hanging in my classroom, but I forgot. (I guess I was too busy teaching.) I ended up taking two crayons off, gluing some ribbon, and then re-gluing the crayons over. So either way it worked out.

I also bought this apple and star from Michael's. They are little wood pieces that were already decorated. All I did was use a paint Sharpie to write my name.

I will try to take a picture of it hanging and add it in later this week. Today (the second day of school), I successfully learned the names of all of my students. I had them time me and I did it in 40 seconds. Tomorrow I am going to beat my time!

UPDATED:

Here is the picture of the wreath hanging in my classroom.

Monday, August 27, 2012

First Day Jitters

Today was the first day of school with my new fourth graders. So far, I have 25 students with 15 of them being boys! My friend at work showed me a picture of her son today on the first day of his senior year. She was joking about taking a picture of him, and then I admitted that I still take a yearly photo on the first day. My mom always took pictures of us growing up and I've continued the tradition as a teacher. Here was last year's photo! This was the best I could do with my self-timer, since Justin is still deployed.

While I was pretty excited for my first day, Iivana on the other had was not. She knows when I'm off to work and she will be in her room. Just look at that face. She knows the way to her mommy's heart, and sometimes I wish I could still stay home with her! (Remember, I'm a crazy dog lady now.)

I was also going to tell you about this sweet wreath I made for my classroom, but I am exhausted! I talked more than I'm used to today and according to my pedometer I walked twice as much as what I have been lately. Hopefully tomorrow night I have a little more energy, so I can show you how I made this!

Wednesday, August 15, 2012

Colorful Pup

Remember when I went to Painting with a Twist? I had a blast there and definitely want to go again, but I can see how it can get a little pricey to go often. After my first experience at PWAT, I felt more confident in my painting abilities. They walk you through the painting process, so anyone can paint! 

While looking at the calendar for future classes, I came across this neat dog painting. I thought the color scheme would go perfect in my kitchen with these food pictures and colored mats. But I wanted my painting to be of my sweetheart, Iivana. So I decided to take on the task at home!

I already had some blank canvases at home from my melting art project when we bought a value pack. However, I did have to invest in some brushes and acrylic paint. I bought 3 brushes from Michael's that were on sale for 3 dollars each. I bought a small, medium, and a larger sized one. I also bought this starter pack of paint for 9.99, which I used a 40% coupon on so it was even less. Since I'm a teacher, I also got 15% for an educator discount. So I maybe spent 15 bucks on this project. I will eventually buy more colors and alternate brush sizes, but I wanted to make sure that I could paint at home first.

I used my computer as a guide and pulled up the PWAT picture and a picture of Iivana that I took during a personal photo shoot of my doggie. I sketched an outline of her. This was probably the most difficult part, because it was the structure of the painting. 

It's light but you can see my sketch.

Then I painted solid color bases.

I guess I got carried away and didn't take pictures of my other in between steps. I mixed colors, painted layers, let them dry, then added more color. The good thing is that if you mess up, you can let it dry and paint over it. I worked on it for a couple hours one day. I left it like this and then finished it up the next day.

My finished product! What do you think? Does it look like Iivana? The eyes were really difficult for me to mimic. I also think the face on this painting is a little longer than hers, but I like it!

This is the picture I used to draw her from.

Sunday, July 8, 2012

Traveling, Birthday, & Food

Well, we hung around the hotel while they fixed the van. Iivana enjoyed looking out the window at the hotel.

She especially liked laying in the bed.

We had a late start on Thursday due to the fixing of the van tire, and spent the night in Indiana. We arrived in Michigan on Friday, July 6, my hubby's birthday. I was even able to Skype with him! I sent him a package for his birthday that included a microwaveable brownie packet in a mason jar with a candle. The brownie mix is gluten free, Pamela's individual packets.

I also filled the package with balloons, an idea I saw on Pinterest. In each balloon, I included money or a note. Apparently I didn't keep track of the money and only sent him $11. His co-workers wondered if there was a significance to the number 11. (No, just a zany wife!)

For dinner on Friday, we enjoyed some Carlo's Pizza, a local place right by my parent's house.

Of course my pizza was gluten free. I ordered mine with mushrooms and green peppers. The crust was thinner, but tasted decent. It must not have been too bad, because I ate half of my pizza for dinner.

Iivana has been adjusting to my parent's house. She has more room to roam around, so we've been trying to think of ways to contain her. She managed to squeeze through the chairs anyways. She is loving all the attention from my mom and dad.

And now I'm brought to today. Sipping on Biggby coffee, I was working on comps for my master's most of the day. They are due tomorrow! Hopefully this will mean more regular updates in my future.

Sunday, April 22, 2012

Felt Flowers

Yesterday I went to the craft store to pick up some more adhesive to finish up my curtains to add to the dining area. While I was there I got the idea to create my own flowers for Iivana's collar. She used to have one but it recently saw it's last day and fell off.

This was her old flower.

I made her a double combo of two different flowers. I followed tutorials that I found on Pinterest to make each flower. The pink flower tutorial was from here. The red one won't open the link. I basically cut a swirl and cut half circles. I wound it together tightly. I used regular cheap felt that I bought for 29 cents a sheet. The one blog recommends wool felt, which I think I'll try next time. The wool felt looks nicer. I was just playing around to see if they really were easy to make and both flowers were! 

Then I cut a piece of elastic and hot glued it to the other side. I covered it with a small flap of felt and glued that as well. I didn't take pictures of this process because to best honest I wasn't sure if it would work or hold.

Then I hot glued both flowers to each other. Once I let them dry, I checked to see if they would fit her collar. They fit beautifully.

I'll see how long these last, but I figured it would be a less expensive option that buying her a new one. I can make her different ones and switch them out on her collar. I'm excited to try some different flower types and with better felt.

Saturday, April 14, 2012

GF Food on the Wall

I'm a picky pinner. When I see things on Pinterest, I only pin it if I think it is something I will really do. When I saw this idea, I knew the perfect place for it and instantly pinned it for home decorating inspiration.

I ordered the 12 x 16 colored mats for $16, however the shipping cost practically just as much! I figured it would be easier and save me time by ordering them from the place that was suggested. I'm glad I did too because I love the colors! I bought eight 12 x 16 in frames from Michael's when they were running a buy one get one free sale on frames. They're poster frames so they are probably not as nice as the Pottery Barn ones that were suggested to use. However, I saved some money buying ones that were cheaper; each frame was about $6 for me. 

Justin offered the suggestion to use food themed pictures since this project was going in the eat-in kitchen area. I loved the idea since I'm constantly taking pictures of our gluten free foods. I picked several different food pictures and decided which ones looked best in black and white. Getting the photos printed, buying the frames, and ordering the colored mats was easy. My biggest nemesis became hanging the frames. Justin's not here to do it for me either so it was either let the frames sit for six months or try to figure out how to hang them evenly on my own. Before I began to hang them, I measured the space I had to work with and realized the configuration I saw on Pinterest would not work in the space I had. If I hung them in 3 rows, they would be too high or go below the table, so I decided to hang them in two rows of four.

I laid the colors out on the table and started to hang. But then I was quickly stalled...it looked like this for a few days. I wasn't sure how to make sure they would be evenly spaced and level.

I made a trip to Lowe's to purchase a laser level. I took this picture with the directions, because despite being a teacher I hate reading directions. Ugh, I had to figure out how to use the laser level. (Also in the background you see a paint stick, I tried to make a picture hanging contraption that I also saw on Pinterest. It didn't work though because the one paint stirrer wasn't strong enough to hold the picture.)

I was happy to invest about 20 bucks in the laser level. It made the process so much easier. The red laser made a level line that I could follow. Then I measured with a ruler to make the spacing between each.

My first row looked even and pretty darn good, if I do say!

I moved the level down and left 2 inches between each picture.

Even with a glare, the pictures look amazing! (My photo taking abilities make it appear a little crooked.) Can you place each picture with a blog entry? They all have made an appearance before.

Viola, the only bad part is the glare in every picture. I'm not a master photographer and the sun shines through the doors near this area.

After hanging the pictures I was inspired to do a little more decorating in the room. I ordered a black and white rug. I'm trying to do black and white with the pops of color. Currently I'm working on some curtains to add too. Hopefully those will be done soon. I also want to add a bright colored buffet, but will need to wait until Justin returns because I want to buy a cheap one on Craig's list or from a flea market to redo.

Wednesday, January 25, 2012

Melting Art

I came across crayon art on Pinterest. I thought it was a unique concept, however I also thought they could look a little kiddish and well...we don't have kids. (Unless you count the monster below.)

After more searching, I saw a couple different versions where people created flowers by flipping the crayons upside down. I think the original idea came from etsy...if you're not into making crafts but like the idea just search "crayon art" on etsy for a range of options. The screenshot below was my inspiration for my second Pinterest project.


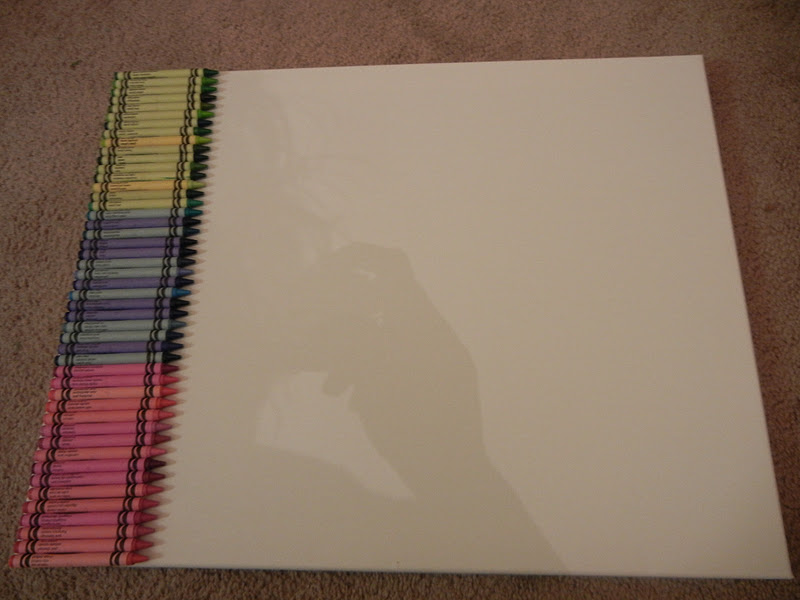
When we were at Michael's over the weekend, we picked up some more crafts. Justin found flowers made of a wicker-type string. I also picked up the biggest box of crayons I could find. Justin and I both used 40% off coupons on the flowers and crayons! We also needed a 5-pack of canvases (only $14); I figured I could find some more things to make on the other four.

First I pulled out all the green shaded crayons but soon found myself with a dilemma. There were not enough green crayons to fit across the bottom and I wanted to make it that night. My choices were to use green, brown, and yellow hues or use other colors that weren't real stem colors of flowers. I debated and decided to give the other colors a try. I figured if it didn't look good with the flowers, then I could take the art to school. I chose 3 colors: green, blue, and pink because I had 3 flowers. With the flowers being brown, I thought the contrast could work. I used a glue gun to align all the crayons and decided to hide the Crayola logo.

Then I covered a corner of the room with newspaper and put the crayons on the top, so gravity could help. Hot wax can and will fly if you're not careful.

I used a hair dryer, several sites suggested using it or a heat gun. I held the dryer over different sections until the wax started to drip. The hair dryer made it a little difficult to control the drips near the crayons; it seemed to blow lots of the colors together and I had trouble making defined lines. If I wanted a certain drip line to continue further, I simply held the dryer near the section until it began to move more.

I kept going, so there wouldn't be as much white space.

If you know me, you know I love chewy candy and I found these brand new Sour Patch Kids Berries at HEB. From reading the label and research online, I concluded they were GF. I snacked on some while I worked on my project and thought they matched my art well.

These were so delicious. I'm not sure of the exact flavors but know for sure there was a blue raspberry. I'm thinking maybe strawberry, cherry, and blackberry...but don't quote me.

I placed the flowers before I glued them to decide if I liked the final product. Although it didn't turn out as originally planned, I was happy with the results.

It hangs on the stairwell.

I think it fits perfectly with the other pictures, which by the way were mostly created by family members. The bottom left abstract piece was painted by Justin's grandmother. The flower picture above that was a wedding gift from a second cousin who also created it. The middle picture of two flowers was taken on our second anniversary of passion flowers in Fredericksburg and made into canvas art thanks to a Groupon. The "I will always love you" sign was bought on etsy for our third anniversary because it quotes our song. I think the wall is unique to us and we have a couple more ideas to expand it.

I'm trying to be a little more creative with my camera shots.

3-D art

LinkWithin

Related Posts Plugin for WordPress, Blogger...