Sunday, November 27, 2011

Food Highlights from Turkey Day

I think I may finally be pumpkined out! Remember there were:


And now introducing pumpkin custard...

The pumpkin custard was inspired by a recent trip to The Cove where we enjoyed some sweet potato custard. (To find out more about The Cove, look here.)

I decided to make my very own custard for Thanksgiving; I figured it would be similar to pumpkin pie without the crust. Crust isn't my favorite thing anyways, so why go through the trouble of making it GF. I followed this recipe, except I didn't make the topping. It seemed like it would be way too sweet with the topping. I also doubled the recipe to make enough to share. 

Here's the pumpkin, eggs, half and half, and brown sugar.

I used my Kitchen Aid mixer to simply mix all the ingredients together.

The most difficult part was filling the pan with water and deciding how much to use. The recipe called for about an inch of water, but I read somewhere else that the water should be as high as the custard. I hoped I didn't fill my custard cups too full. I also used glass Pyrex pans rather than a metal 9 x 13 inch pan to hold all the custard dishes.

Ready to go in the oven

Browned on the top and out it came! Again, since I didn't do the topping I kept the custard in the oven for the whole 50 minutes. It didn't taste as thick as The Cove's custard, but it still tasted delicious. It was yummy enough to eat one the night I made them, one the next day, the next, and the next....hence I am now pumpkined out!

We celebrated Thanksgiving in Wimberley, but still wanted to bring some food to share. Justin had been talking about a Turducken (turkey, duck, and chicken combined) for years. So this year he bought stuff to make a Turducken roll, which consisted of the meat from three breasts in the bird family. I told him to document the process, but as you can see in the picture below...a Turducken is a complicated recipe, especially since he also used three types of stuffing that were all GF by the way. This is what it looked like after all the layers. The next task was deciding how to wrap it all together.

 There were a few mishaps along the way....but nothing major.

Several different ingredients on a small counter.

And one hard worker

We decided to go with what we called "the taco method" and put both sides together. Then Justin proceeded to wrap the meet with several strings and we prayed it would stay together.

The next day, he smoked it on the grill. It stayed together rather well and tasted amazing! I think everyone was impressed. I can't believe I didn't take a picture of the roll on my plate. I see more Turduckens in our future.

We enjoyed getting away for a few days. Iivana had a fun time in Wimberley as well. She loves to run around and had fun with her new friend. She spent time in the sand box and rolling around in mud.

Tuesday, November 22, 2011

More San-J Love

Cut up chicken into 1 inch pieces

We coated it in brown rice flour, I'm interested to try an all purpose GF flour.

Shake until it is fully covered.

The special sauce: San-J Orange Sauce

We don't have a deep fryer, so we used our wok to fry the chicken pieces.

Of course, Justin was doing the frying...I have absolutely no frying skills. He fried half the chicken at a time.

One sleepy dog, makes cooking much easier.

Warm orange sauce, then add fried chicken.

Warm until sauce thickens and bubbles.

 Add some sliced carrots and green onions

Serve over brown rice.

Garnish with more green onions and the deliciousness is ready to eat.

We had been on a hunt for the San-J orange sauce and finally found some this past weekend. Even though the chicken was fried, we had controlled portions and were able to enjoy some GF Chinese food. I would recommend the orange sauce, just like the peanut sauce.

Monday, November 21, 2011

Getting Mussels

I think soon Justin is going to have to start writing some entries on here because he does the majority of the cooking. Many times I'm his sous-chef, so I'm knowledgeable enough about the recipe to blog about it. On this occasion, I took no part in the cooking. But I can't not (double negative, I know) blog about mussels!

Here's the recipe:
(of course he subbed GF beer for the ale)

All the ingredients

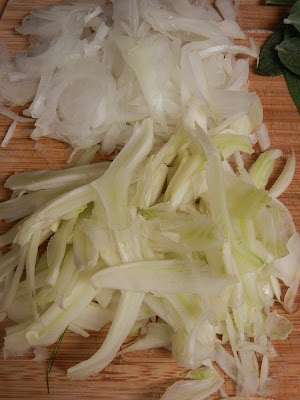
Shaved fennel, onion, sage, and Spanish chorizo

Spanish chorizo

Onion and fennel

Redbridge and white wine

Live mussels! So freaky how they opened and closed.

I think the ones in the red bowl were ones you could use because they closed up when they were washed. The ones in the strainer had to be thrown out. This is why Justin should be writing this, to give more detailed explanations.

I couldn't believe I was going to eat these!

Ready to eat

So cheesy 

My first bite into a mussel and it got stuck in my teeth! Justin grabbed the camera and snapped this action shot. At first the texture was gummy-like, but I got past it. The Gouda cheesiness with the Spanish chorizo and butter gave it full rich flavor.

We ate all our mussels and I will definitely try them again.

Saturday, November 19, 2011

Thankful Week Off

I have the week off of work and am so thankful for it. I figure I'll be able to blog a little more, do some homework, clean the house, spend time with my hubby, work on school stuff, and start decorating for Christmas. The list seems long, but I can be flexible.

Here's a blast from the past, aka a recipe inspired by Noodles and Co. (where Justin and I met while working) before they changed their menu many years ago. Want another Noodles and Co. inspired dish: find it here. Justin and I decided to make our own version of a peanut salad.

I started by chopping carrots and green onions. After that I washed some sprouts.

I followed the directions on the Thai Kitchen Rice noodles box. Then I added some San-J peanut sauce. You can find my love for San-J peanut sauce here, here, and here.

The salad is fairly simple: spring mix combined with the rice noodles. Then I topped it off with the carrots, green onions, and sprouts. Chicken was sliced and placed on the top.

Justin made a dressing with the San-J peanut sauce combined with some balsamic vinegar and olive oil to taste. The salad was so filling and a blast from the past. Now if I could only find some GF med dressing.

Friday, November 18, 2011

Reuben!

Remember when Justin and I went to Dallas for the GF Expo? We purchased a couple packages of GF bread mixes made by Montana Gluten Free Processors. I thought the brown bread mix would be prefect for some GF Reuben sandwiches. 

I followed a recipe that I received when I bought the mixes for European Brown Bread.

1 pkg. Montana GF Bread Mix
2 1/4 tbsp. yeast
1 Tbsp. sugar
1 Tbsp. instant coffee
2 Tbsp. unsweetened cocoa powder
1/2 tsp. caraway seeds (I omitted these.)
3 eggs
1/4 cup oil
1 3/4 cup water between 110 and 115 degrees
1 tsp cider vinegar

The recipe said to mix all dry ingredients first. Then eggs, oil, and vinegar were mixed in a different bowl. After that I combined the two mixtures, and slowly added water to get a cake batter consistency.

It baked at 350 for 45 minutes. The bread came out looking well. It was moist and had a decent consistency. Since I made the bread, I couldn't get over two of the ingredients: cocoa and coffee. I felt I could taste the two and it didn't seem right. However, Justin said he didn't notice. The bread was good and worked for the Reubens.

I sliced the bread, used Boar's Head corned beef, Swiss cheese, and sauerkraut.

And topped them off with Thousand Island dressing.

Delicious! First time I had a Reuben in years.

I'd be interested to try other pumpernickel/rye-like breads, of course, sans rye.

Saturday, November 12, 2011

More Pumpkin

Halloween may be over, but it's still fall, which means more pumpkin recipes.

For some reason, this season I've been especially into finding recipes with pumpkin...I think it started when my hubby made these for me.

I wanted to make pumpkin GF waffles. I started with GF Bisquick.

I searched the Internet for a recipe; I had some trouble find something that wasn't completely from scratch. So I used my cooking skills and modified this recipe that is used with regular Bisquick.

I started by following the box's directions for GF waffles, found here. Then I stirred in a half of cup of pumpkin, which is naturally gluten free. (Just be careful not to buy the pre-made pie filling.) I also added about a tablespoon of brown sugar, 1 teaspoon of cinnamon, and 1 teaspoon of vanilla.

They came out with a nice orange color, which may be difficult to see here. Justin and I both loved the way they turned out. The pumpkin flavor was apparent, but not overpowering. My only critique was that they had a spongy, wet consistency, which we weren't sure if it came from all the pumpkin. Maybe next time, I'll try a little less pumpkin. Regardless, they were a wonderful first attempt.

We tried them with maple syrup, but it was almost too sweet. So I had in mind another idea: some vanilla gelato. I only used this one little scoop and it was plenty for the entire waffle.

To do the job, I used Talenti's Tahitian Vanilla Bean gelato. (If you haven't tried this brand, it is amazingly good and you can actually read the ingredients on the back.

Milk, sugar, cream, powdered milk, vanilla, dextrose, guar gum, and lemon! The first picture below shows that this is gluten free.

LinkWithin

Related Posts Plugin for WordPress, Blogger...